


買的時候據說是ROHM的,根據ROHM網站,腳位由左至右分別是Rout, GND, Vcc。

很奇怪,房東的東元冷氣是吃NEC的Protocol~~
 |
| Arduino小書兩枚 |
 |
| 兩顆Shift Register控制10 pin LED Bar 一 |
 |
| 兩顆Shift Register控制10 pin LED Bar 二 |

highByte()和lowByte這兩個method,順序是high byte部分先送,再送low byte。void loop() {
// 1024 = 2^10
for( int numberToDisplay = 0; numberToDisplay < 1024; numberToDisplay++ ) {
byte high_byte = highByte( numberToDisplay );
byte low_byte = lowByte( numberToDisplay );
Serial.println( numberToDisplay );
digitalWrite( LATCH_PIN, LOW );
// bitOrder: which order to shift out the bits; either MSBFIRST or LSBFIRST.
// (Most Significant Bit First, or, Least Significant Bit First)
shiftOut( DATA_PIN, CLOCK_PIN, MSBFIRST, high_byte );
shiftOut( DATA_PIN, CLOCK_PIN, MSBFIRST, low_byte );
digitalWrite( LATCH_PIN, HIGH );
delay( 500 );
}
}
analogRead()的值透過map()把比例顯示在LED Bar上。

/*
 * Keypad 1
 */
#define NumRows 4
#define NumCols 3
#define DebounceTime 20
const char keymap[NumRows][NumCols] = {
  { '1', '2', '3' },
  { '4', '5', '6' },
  { '7', '8', '9' },
  { '*', '0', '#' }
};

// pins
const int rowPins[ NumRows ] = { 5, 4, 3, 2 };
const int colPins[ NumCols ] = { 8, 7, 6 };


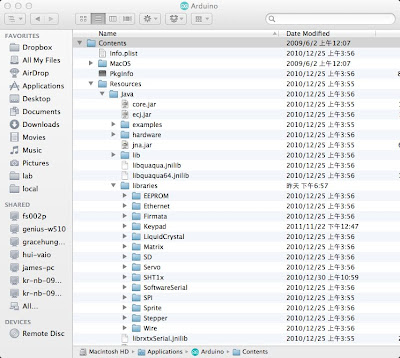
/Applications/Arduino.app/Contents/Resources/Java/libraries,也可以看上面Finder的截圖。
pulseIn()取得Echo pin HIGH pulse的時間;另一個是距離的計算根據datasheet說明的Echo back pulse width(這裡是Echo Pin由LOW -> HIGH -> LOW的時間) microseconds除上58就是距離(cm),除上148就是inch的距離。/**
* Ultrasonic 1: 超音波測距 秀在Serial Port 9600
*/
#define TrigPin 10
#define EchoPin 13
long ping() {
// PING
digitalWrite( TrigPin, LOW );
delayMicroseconds( 2 );
digitalWrite( TrigPin, HIGH );
delayMicroseconds( 10 );
digitalWrite( TrigPin, LOW );
return pulseIn( EchoPin, HIGH );
}
void setup() {
pinMode( TrigPin, OUTPUT );
pinMode( EchoPin, INPUT );
Serial.begin( 9600 );
}
void loop() {
long duration, cm;
String result = "Distance: ";
duration = ping();
cm = duration / 58;
result += cm;
result += " (cm).";
Serial.println( result );
delay( 1500 );
}


| Analog Input | Analog Output | |
|---|---|---|
| Resolution | 10 bits (0~1023) | 8 bits (0~254) |
| Votage Range | 0~5 (Volts) | 0~5 (Volts) |
| Arduino Pins | A0~A5 | Digit Pins 3, 5, 6, 9. 10, 11 |
| Arduino Mega Pins | A0~A15 | Digit Pins 0~13 |
digitWrite(pin, value)第二個參數是HIGH/LOW;analogWrite(pin, value)。然後很無聊的做兩個練習,分別針對digit pin 13/11使用analogWrite()。/**
* Analog out on Digit Pin 13 test
*/
const int ledPin = 13;
void setup() {
pinMode( ledPin, OUTPUT );
}
void loop() {
for( int i=0; i<10; i++ ) {
analogWrite( ledPin, 54+(i*20) );
delay( 1000 );
}
}

